building a fence around ac unit

Home Guides Home Home Improvement DIY How Close Should Walls or Fences Be to HVAC Units? Email Reddit Proper clearance around central air conditioners is important for efficient operation. The outdoor component of a central air-conditioner unit is usually located at the rear of the house or to one side. This cabinet includes the compressor, the condenser coil and the condenser coil fan. When the A/C is running, the outdoor unit disperses heat from inside the house into the outside air. Air Flow Is Important The performance of the air conditioner depends upon efficient outdoor heat dispersal, which relies upon adequate air circulation into and out of the condenser coil. The blower fan intakes fresh air horizontally through grilles on the sides of the cabinet, channels the air through the condenser coil passages and exhausts the air -- along with heat extracted from the home -- vertically from the unit's top. Nearby walls, fences or vegetation may interfere with the free flow of air into the unit.

Decks or other overhanging structures above the unit may hinder the dispersal of exhausted air. These can degrade the air conditioner’s performance and efficiency and even affect its service life. Allow 1 to 3 feet of open horizontal space next to intake grilles of the outdoor unit to allow optimum air intake. To avoid excessive heat buildup inside the condenser coil and ensure proper heat dispersal, leave 4 to 6 feet of vertical clearance above the unit.
central ac repair or replaceReferences Inspectapedia: Air Conditioner Compressor Installation Errors Photo Credits Comstock/Comstock/Getty Images Suggest a Correction How to Prompt a Rose Bush to Grow Vigorously When prompted in the right way, a rose bush can grow ...
ac unit for 2500 sq ft houseHow to Mulch Squash Using mulch around things like squash always requires ...
air conditioner window unit fire
How to Keep Basil From Bolting When basil begins to "bolt," this means that it has ... How to Fertilize Celery Plants Celery plants should either be grown in raised beds or ... Here's an easy thing you can do to keep your air conditioner running as efficiently as possible: Don't crowd the condensing unit, the outdoor part of your AC. In the photo at left, you see a common problem. I took this picture at a brand new house a couple of months ago, and there's not a problem right now, but what's going to happen to those shrubs planted around the condenser?As the shrubbery gets bigger, it's going to crowd that condensing unit. When it does, it's going to restrict the air flow across the condensing coil. Remember the articles I wrote about the refrigeration cycle — part 1, in plain English and part 2, in a bit more technical language? If not, now might be a good time to go read them. Basically, the condensing coil is where all the heat that got picked up from your home gets dumped outside.
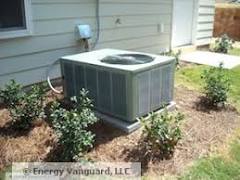
Your AC is engineered to remove the heat by having a designed amount of air flow over the condensing coil. If less air flows over the coil, less heat is removed. That means the whole cycle warms up a bit, and your AC works harder to keep your home cool. You'll pay extra for it in more than one way: (i) Your monthly electric bill will be higher; (ii) your equipment may not last as long, so you'll pay more in repair bills and in having to replace the AC sooner. There are a lot of ways that condensing units get their air flow blocked. The most common is from plants growing too close to the unit, as shown above. Dirt and leaves piling up around the condenser cut air flow, too. These are things you can easily control by trimming the plants around the condenser and clearing away any debris. If enough dirt gets between the fins of the condensing unit, that's also going to reduce air flow. When you get your HVAC system serviced each year (you do, don't you?), the service tech should check and clean the coil if necessary.

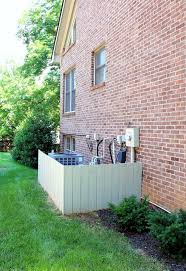
Sometimes, the HVAC company creates the problem. The photo below shows one such case. Not only are those condensing units too close to the wall of the house and the fence, they're way too close to each other, too. They're going to be fighting each other for air when adjacent units are running at the same time. This is a terrible installation and should never have passed the building inspection. So, keep some space around your condenser and let your air conditioner breathe! Building a new home or remodeling your existing home and installing new HVAC systems? We can help with complete HVAC design services. 6 ft. H x 16 ft. L Natural Reed Bamboo Garden FenceD x 6 ft. H x 8 ft. Natural Rolled Bamboo Fence 6 ft. x 15 ft. Reed Fencing (4-Pack) Summer Scroll 3.66 ft. x 3 ft. Black Steel Fence PanelD x 4 ft. H x 6 ft. L Natural Rolled Bamboo FenceH Black Steel Alexander Border Garden FenceD x 6 ft. H x 8 ft. W Natural Rolled Bamboo Fence Empire 2.5 ft. x 3 ft. Black Steel 3-Rail Fence Panel
3 ft. x 15 ft. Plastic Black Hardware Net Victorian Fleur De Lis Medium 16 in. Resin Garden Fence (12-Pack) 6 ft. H x 15 ft. L Reed Fencing 7 ft. x 100 ft. Dalen Products Black Polypropylene Protective Fencing 7 ft. x 100 ft. DeerBlock Protective MeshH Black Resin Garden Border FenceWood Picket Garden Fence 4 ft. x 8 ft. Natural Peeled and Polished Reed Fencing Beaumont 3.33 ft. x 4 ft. Black Steel 3-Rail Fence PanelH White Classic Picket Style Plastic Garden FenceCathedral Steel Wire Folding FenceBlack Solid Steel Wire Black Chelsea Wrought Iron Garden FenceRomantic Folding Garden Fence 7 ft. x 100 ft. Polypropylene Deer BarrierH Black Wrought Iron Yorkshire Border Garden FenceH Black Solid Steel Wire Cambridge Garden FenceNo membership or credit card requiredGet StartedNo thanks, I'm not quite ready. 7 Cool Tips To Hide Your Air Conditioner Back in 2012 I shared my experience replacing a post on our pergola that had suffered termite damage.

It was pretty bad (I’m glad ithat sucker hadn’t tipped over!) At that time I also removed a rotten trellis that surrounded the nearby A/C unit (of course I didn’t take a photo of it at the time, so here is my ever so fancy artist’s rendering:) When I tore it down back in 2012, I was left with a spiffy new pergola post and a whole lot of ugly air conditioner (which I am always paranoid about since I worry the kids will throw something inside of the fan or even stick their fingers in!): Back in that original post I had an inspiration photo for what I wanted to build “some day”:believe it or not.. Check out my version: You can see my toddler likes it! The beauty of this design is that it meets the manufacturer’s requirements for clearance and doesn't impede air flow to the unit. What am I talking about? Because the purpose of the A/C condenser is to suck in air and run it over the cooling coils (as fast as possible), if you put anything around the outside (or over the top of) your A/C you force it to work extra hard and greatly lower its efficiency.

You should never put bushes, a plant trellis, fence or anything solid around your A/C for just that reason. That is also why you frequency see lattice around them.. since it allows for a decent amount of airflow and offers a little disguise. Because air is sucked in from the bottom of the unit and blows out via the large fan at the top, that is also why this louver design works so well. Since the louvers are spaced far apart and are angled upward (the direction of the air flow) the air flow resistance is minimal. I also made sure to install my panels 12 inches away from the actual air conditioner, which is the minimum clearance suggested by the manufacturer. Each A/C unit has it's own clearance requirement, so make sure you check before installing ANYTHING nearby.enough talk about A/C efficiency! I am sure you want to know how I built it. It is actually really straight forward. First I measured how tall I wanted the screen to be and cut (4) 1x3s to form the vertical supports for the louvers.

(Mine panels are 36 inches tall). Next I calculated how far apart I wanted my louvers to be and what angle I wanted them to be. I settled on 45 degrees since that allowed me to obscure the view of the a/c best with the least disruption of air flow (plus the math was easiest!) In my case, it turned out that I needed 11 louvers, spaced 3 1/8 inches apart to fill the 36 inch span: Next I measured how wide I needed the screen to be and cut (11) 1x3s which would become the louvers. (My screen needed to 39 inches wide on one side and 37 on the other.. so I cut eleven 1x3s at 39 inches long and eleven at 37 inches long.) The kids helped me prime and paint them before assembly. I knew it would be a pain to paint louvers once they were assembled:To make assembly easy, I cut a couple of 1x3s in 45 degree triangles and used them as a ‘jig’ to support the louvers. I marked off every 3-1/8 inches and lined up the triangle blocks on each mark. This allowed me to maintain the spacing and angles without any complicated math.

I used clamps to hold the support blocks in place and then predrilled through the board and into the end of the louver. I secured each louver in place with two 2-inch deck screws on each end.Then I just repeated the process.. over and over and over. It wasn’t difficult since I only had to line up and clamp the little triangles and then drill, but it still took a while to assemble all 22 slats. (That is 88 holes and 88 screws!) Here are the finished products set out near the A/C. I needed a corner support post, so I installed a pressure treated 2x2 and attached the screens with 2-inch deck screws (I also attached the other ends to the pergola post and the fence): To secure the post to the concrete patio, I used a Strong Tie E-Z Base, which was super easy to use (I will eventually paint it white so it doesn’t stand out) Just like the other pergola post I installed, I used wedge anchors to attach the footer to the concrete. Finally, for a finished look, I added a 1x3 (yes, the top is wider than the louvers) which I mitered at the corner.