can i replace my ac unit myself
Like so many powerful innovations, central air conditioning is easy to take for granted. The cool, dry air that whispers unceasingly from wall and ceiling registers can lull us into a false sense of security. Then an electric bill arrives, or the system starts to falter. Suddenly we realize that basic maintenance was called for--just cleaning the air filter would have cut cooling costs 5 to 15 percent. Or perhaps it's time to replace an old and inefficient central air conditioner. There are a number of options to consider, including high-efficiency systems that can reduce electrical cooling costs 20 to 30 percent. Here's a crash course in the mechanical system that helps you keep your cool when temperatures start to climb. Conventional central air systems graft into a house that has ducts for forced-air heating. The hot and noisy portion of the cooling system, the compressor-condenser, is located outside. The cool and quiet component, the evaporator coil, is located inside, above the furnace blower.

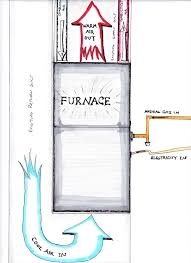
Cool, dry air is distributed; warm, humid air returns to be cooled and dried.%" align="center" style="padding:2px;border-right:1px solid #ccc;">%" align="center" style="padding:2px;border-right:1px solid #ccc;">%" align="left" style="padding:2px;border-right:1px solid #ccc;">Houses heated with boilers lack ducts to distribute cooled air. They can be centrally cooled with mini-duct systems in which an evaporator coil, fan and trunk duct are located in the attic. Cooled, high-velocity air is piped from the trunk duct through flexible, insulated plastic ducts.>A ductless split system is the answer for many homes that are not centrally cooled or that need more cooling after an addition is built. The compressor-condenser serves one or more evaporator coil fan units installed on the inside walls of the house.The Refrigeration CycleMechanical, chemical and thermal energy act together in your central air-conditioning system to cool and dehumidify indoor air. Warm liquid refrigerant is driven under high pressure toward the evaporator coil.2.

Near the evaporator, the liquid flows through a metering device that functions like a garden-hose nozzle. It converts the warm, high-pressure liquid into warm, low-pressure droplets.3. As the droplets enter the evaporator coil they begin to cool, and the droplets are transformed into cold vapor.4. A fan blows warm, humid indoor air over the cold coil. Moisture in the air condenses and drips off the coil into a pan to be drained or pumped away. The gas in the coil warms as it removes heat from the indoor air.5. When the compressor turns on, it draws the warm gas toward its suction port. The gas enters as a warm vapor and leaves hot and at high pressure. Now it enters the condenser, and as it makes its way through the labyrinth of tubing, it gives up its heat to air moved by the condenser fan. The gas condenses into a warm liquid ready to repeat the cycle. The Lennox SunSource is a heat pump with a solar assist. Its condenser fan motor draws power from a 190-watt photovoltaic panel, a $3000 add-on.
The high-efficiency heat pump itself costs $4000 to $7500, depending on the installation. The equipment runs the refrigeration cycle in reverse for winter heating, so it achieves energy gains year-round, not just in the summer cooling cycle, accelerating the energy payback of the photovoltaics. In most cases the solar panel is installed in a sunny location, either on the roof or the side of the house. Wiring then runs from the panel to the fan motor.
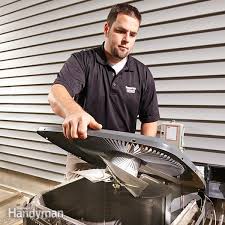
carrier ac unit filterEquipment CheckThe best way to ensure a steady flow of cool, dry air this summer is to do a little basic maintenance this spring."
ac unit 2000 sq ft houseThe key to maintenance is air flow," according to PM contributor Pat Porzio, a heating-cooling contractor and mechanical engineer.
electric heater air conditioner wall unit
Ensure that air can move freely through the compressor-condenser by using a shop vacuum to remove grass clippings, leaves, dryer lint and any dust discharged from a central vacuum system. If the equipment is near a dryer vent, check it weekly.Clean dirty compressor-condenser fins using specialized foaming cleaner, sold at supply houses and on the Web. Don't use household cleaners, which can cause corrosion. Rinse the fins with a garden-hose nozzle pointed down, not horizontally, to avoid blasting dirt into the equipment. .+ Check the air filter monthly and replace it when necessary.+ Keep the thermostat set at 78 F.+ Seal leaky ducts with mastic and tape to prevent loss of cooled air and infiltration of dust and dirt into the duct system.+ Seal gaps around the home that allow cool air to escape.+ Open vents that were closed during the winter.If you've noticed that your central air conditioner isn't cooling your home quite as well as it used to, the culprit may be Freon leak in your system.

Freon is a refrigerant, or coolant, which helps your AC unit evaporate its internal heat and allows the air is expels to actually be cool. If you have sprung a Freon leak, you’ll have to seal the problem area, replace the leaking substance, and replenish the amount of refrigerant in the system. This process of adding coolant to an AC unit is called recharging. Even a DIY veteran can have issues with his project both because it can be quite a technical process and also because many areas have laws regulating the use of Freon. However, if you adhere to your local laws and follow these steps carefully, you can safely repair and recharge your AC unit. The first thing you need to do is find out what type of Freon you’ll need for your air conditioner. If your unit was built prior to 2010, it's likely going to use R-22. To be sure, you can check the unit itself for a label that specifies which type of coolant to add. The newer systems don’t use refrigerant, so make sure to check your unit before deciding a leak is the cause of inefficient cooling.

If you’re certain a leak is the problem, you should purchase a Freon repair kit. These kits are excellent for HVAC beginners and generally come with a reusable injection hose, an AC sealant, and most importantly, a detailed set of instructions. Otherwise, you can choose to buy these items separately in addition to your pressure and temperature gauges. Turn off your air conditioner and temporarily turn off the circuits that send power to it. If you are committed to doing any internal air conditioner repair, having any electricity running through the system, even if it’s not turned on at that moment is dangerous. Put on your goggles, gloves, and a breathing mask. While a substance like Freon is more toxic to the environment than it is to humans, it is still important to protect yourself thoroughly. Even when it’s clear something is wrong, the only way to be 100% sure that there is a leak is to do a complete inspection and actually locate a physical leak. Attach a temperature gauge to your valves and wait approximately five minutes to get an accurate reading.

Do your research to determine what an adequate reading would be for your unit model, but anything in the 45 degrees Fahrenheit range generally means your coolant levels are sufficient. If it's above that number, or the number designated in your manual, you may have low coolant levels. Refrigerant doesn't evaporate, so if your AC does not have a sufficient amount, it is because there is a leak. Before you can move forward with recharging your system, you'll want to inspect it to see if you can find the source of the leak. To locate the source of your Freon leak, you'll need to connect gauges to your AC lines in order to detect any low pressure issues. If you’re using a Freon kit, the instructions should clearly spell out what gauges and what lines attach where. If the low side pressure is below 65psi, you most likely have a leak. You can also look for visible signs of leaks along pressure lines and joint connections. Occasionally dyes are added to coolants so that you can visibly see color where a leak is happening.

Once your find the source of the leak, you can start the air conditioner repair process. Now that you've inspected the AC unit and detected any and all leaky areas, it's time to locate the compressor. The compressor will have two lines coming from it. The larger valve is the service valve and the low pressure suction line. The smaller valve is the tap valve and the high pressure liquid line. In order to properly seal the detected leak, you will need to connect the injection hose and the can of sealant to the compressor lines. Again, consult the information provided with your kit if there is any confusion. Once your hose is connected to the supply line and your sealant can is attached to your hose, be sure to not tip the container. It should be held upright to prevent damaging the central air conditioner unit. Depending on which products you have purchased, the specific details for this part of the process will vary. But in any case, you will need to restore power to the unit and have the air conditioner actually operating for this step.

Once you pierce your sealant can, you want to let it run through your system for at least a full minute to be sure the sealer has been properly distributed and that it’s had time to thoroughly patch up any leaks. The sealant will travel with the existing refrigerant to detect and seal leaky areas from within. To recharge your air conditioner, reconnect the gauges to the system and connect your Freon container to the gauges using various hoses. Reconnect your temperature gauges to the lines as well, so you can ensure you’re getting a clear reading. Many people neglect to use the gauges at this point, but that’s a mistake. This is the proper way to recharge an air conditioner, as you want to monitor how much coolant you are adding so that you do not add too much. Once all aspects are connected to your AC unit, you can release the valve on your Freon container and allow the coolant to circulate in the system. Add only small amounts at a time, allowing approximately 10 minutes between each small addition to get a clear reading on the gauges.

Be sure the refrigerant container stands upright for the duration. Tilting the container can introduce the substance into the compressor and damage the whole air conditioner unit. If you believe you’ve added the proper amount, something that is much easier to determine by using your gauges, let the system circulate for 15-20 minutes as a test run. If all signs indicate that your air conditioner is properly cooling, you can detach your gauges and hoses. If your AC is still not cooling off, you either need more Freon, or you still have a leak and need to call an HVAC specialist for further investigation. As mentioned previously, Freon is a regulated substance in many areas. We cannot guarantee this as a process everyone can do on their own, as many will not be able to obtain Freon without a license depending on their local regulations. However, this step-by-step guide is for anyone who can obtain the correct product legally and wants to complete the task without hiring a licensed professional.