my outdoor ac unit won't turn on
If you're like us, you're already feeling the intense heat of (unofficial) summer. This weekend, in fact, we found sanctuary thanks to our amazing air conditioners. If you are anticipating the pangs of the soon-to-be scorching season, it's the perfect time to clean your outdoor air conditioner. Because routine cleaning won't only prolong the life of your machine, but an unclogged, debris-less unit will function more efficiently, costing you less in energy bills. What's not to love about that? The first and most important step to cleaning an outdoor unit is turning off the power switch, which should be located in a small box near the machine. Next, remove any leaves, branches or other debris that may have gotten stuck in the condenser fins, which are the thin metal pieces that run along the exterior of the unit. Then, vacuum the fins with a soft-bristled brush attachment making sure not to bend any fins. Once you're done, unscrew and remove the top grille. The fan will most likely be attached to the grille.

Vacuum any debris around the motor. Then, using a hose with a direct spray, wash down the interior walls, avoiding electrical components and not bending any fins. Finally, wipe down the fan blades with a damp cloth. Have something to say? Be sure to check out Stylelist Home on Twitter, Facebook and Pinterest. Air Conditioner Air Conditioner Cleaner Air Conditioning Maintenance Cleaning Tips Air Conditioners Get top stories and blog posts emailed to me each day. Newsletters may offer personalized content or advertisements.HVAC units play a major role in ensuring comfort within your home. As such, it is important to ensure that they are in good working condition especially during summer when the temperatures can soar. The best way to determine how your system is working is to evaluate the level of comfort.Remember, air conditioning units are not designed to last forever. The average lifespan of a HVAC unit is 12 years. Unfortunately, they tend to fail when you cannot do without them.

Even then, not every malfunction is considered major as there are minor nuisances that are easy to fix at a small fee. That is why it is imperative to ensure proper maintenance of your HVAC system before the onset of summer.
carrier ac unit filterIf you do not know where to begin, here are some summer AC maintenance tips to take into consideration:Possible Cause: Failure of the HVAC unit to turn on may be due to incorrect adjustment of the thermostat.
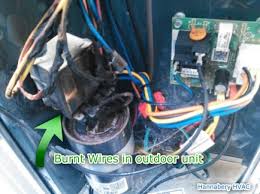
thru wall hvac unitIt is also likely that power is not reaching your AC unit.
outside ac unit on but fan not spinningThe Fix: To correct this, always ensure that the thermostat is set to cool or AC. In addition, check to see that the temperature setting is accurate and the battery is fresh. You will do well to also check the circuit breaker because in some instances, it may be that the fuse has tripped.

Possible Cause: Proper airflow guarantees you comfort. Therefore, if you are not comfortable then your airflow could be having issues.The Fix: Changing the filter is a sure way fix. This should be done as part of your regular maintenance. Generally, the filter should be changed every 30 – 60 days depending on the number of people in the house and the presence of pets. In addition, your unit should be 24 inches away from any form of obstruction to the cold air returns.Cost: Replacing of the filter costs between $5 and $20 depending on the type of filter used.Possible Cause: When your operating costs spike, it is may be a sign that your air conditioning unit is inefficient. Besides a dirty filter, a choked condensing coil is the most probable reason for this. The coil, which has multiple cooling fins like those of a car radiator is on the outdoor unit which can accumulate debris and dust.The Fix: Call up an air conditioning expert for a tune up.Possible Cause: If your HVAC is buzzing, rattling or ticking, the cause might be a loose screw.

However, in some cases, the cause may be much more serious like a bent fan blade on the outside or a broken blower motor on the inside.The Fix: In cases where the screw is loose, it can be fixed by simply tightening and lubricating it. If this does not work then you can replace the fan blade or fan motor with a new one.Cost: $75 to $150 to cater for inspection as well as tune up while replacing your blower motor may require $150 to $750Possible Cause: The most common cause of this is improper thermostat placement. In addition, if the unit is directly under the sun, near a hot oven or too close to a register, then you may experience this. A relocation is also likely to see you spend more time there whereas the thermostat is not.The Fix: Relocating the thermostat is recommendedCost: Free, if you are handy or are keen on using the same unit. A new programmable thermostat will cost $250 while you will pay $90 for the installation electrician.Possible Cause: The unit usually generates moisture in the form of condensation during normal operation.

This water collects then collects in a pan before flowing out in a line either on the condensate sump basin or the floor drain. Thus, when the water accumulates it is a sign of a disconnection or blockage of the tube.The Fix: It would benefit you to inspect the tube for possible clogs, crimps and disconnections. In addition, ensure that the sump pump is in good working condition to handle the water that flows into the sump basin.Cost: Cleaning the blockage is free. Replacing the tube would cost $20 while a new condensate sump pump would cost $40 to $110.Possible Cause: The refrigerant lines are not properly insulated.The Fix: Two copper refrigerant lines connect the indoor system and the outdoor unit. This should be covered using insulating sleeves. In addition, a recharge of the refrigerant may be required.Cost: The insulating sleeves may cost $5 while you may pay up to $150 to recharge the system.Possible Cause: The compressor is burnt-outThe Fix: A failed compressor stalls the operation of the unit.