putting a roof over ac unit

The Bow Tie Royale 6 Cinema Theater contracted Commercial Roof USA to install an air conditioning unit on an EPDM flat roof at 542 Westport Ave., Norwalk, CT. The curb was supplied by the The Heating and Cooling Company located in Norwalk, CT. Mike Tavolacci marked exactly where the curb would be positioned on the roof. We installed the air conditioner curb with vibration dampers used to minimize noise. Video Transcript - Air Conditioner Curb Installation on a Flat RoofHi I’m Erik from Commercial Roof USA And today they called us to do this commercial roof It’s an EPDM roof and they called us because they need us to flash a 10 ton A/C unit Now this needs more than just flashing done.This roof is unleveled so were gonna have to level it you can see there the bubble is off a little bit So um what we are gonna do is we’re gonna level it first. Then on the inside there where you can see the orange marker uh we’re gonna cut the vent the vent or the intake vent and then we’re gonna have to flash the whole thing and uh the way we do it is a is a double step process where we flash on the inside and on the outside so they’ll never have a leak again.
I’ll be showing you every step of the way.This is how to flash a 10 ton A/C unit Alright well we’ve installed the ah curb and we vulcanized the unit here and uh we’ve installed this tarp on here so that when the HVAC people are ready they can just put the unit down on top This is how you install and vulcanize a curbThe a/c curb installation process required us to cut through the EPDM rubber at the markings. Then, we removed a 3″ insulation isoboard. Under the the insulation was a 5/8″ gypsum board.
best ac compressor unitAfter removing the EPDM rubber, insulation, and gypsum board, we had to cut through the metal sub roof, which is the opening for the intake duct to the A/C unit.
central air conditioning units canadaAfter the opening was made for the duct work, we placed the curb into position.
portable ac units commercial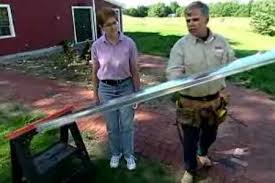
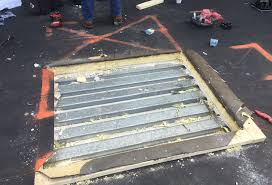
Because the roof is slightly slanted, one side of the curb had to be lifted to be level. After leveling the curb, we anchored it down with 4″ screws to the metal sub roof.After anchoring the curb, we vulcanized the entire curb with EPDM cover tape, and carefully added the flashing, as well, to tie it into the existing rubber roof.We Provide the Following ServicesResidential and Commercial Flat RoofsInstallation of 2 Ply Rubber roofingRepair of all flat roofsReplacing of skylightsRepairing metal roofs inexpensivelyProvide Free Estimates and Advice and best solutionsRe-positioning Drains to cause positive flowInstalling Scuppers to remove pooling waterA/C curb installationFinding and Repairing all leaksRoof Drain Use this email to send images of your roof problem. Text Messaging: 203 858 0080 Images of A/C Curb Installation Steps:Make sure all the measurements are correct and the location is properly marked.Prep surface area by removing all debris and water. 3. Cut the rubber and insulation away to expose the metal sub roof.

4. Below is the metal sub roof after the EPDM and insulation was removed. Use a metal reciprocating saw to cut this section out.Extreme caution must be taken during steps 3 and 4 because there could be electrical wires on the underside of the metal roof. In this case a drop ceiling hanger wire was attached to the the metal so we were fortunate enough to remove it without disturbing the drop ceiling.5. Placing curb into position and ensuring it is level:Since the roof was slightly slanted, we had to lift the curb by 5/8″ on one side to get it level. It is important to have it absolutely level; if it is not level, the bearings will wear of faster on the A/C unit.6. The roof is slightly slanted and it was necessary to level the curb before we started to install the flashing. We used 5/8″ wood strips under the one end of the curb. After getting it level we secured the curb to the roof with 4″ screws that held is into place.7. Vulcanizing and flashing the air conditioner curb.

Once the curb was leveled we covered the entire outside of the curb with EPDM cover tape. To flash the curb, it is necessary to clean the existing roofing surface very well. We used lacquer thinners and rags to remove all the oxidation from the surface where we needed to adhere the new EPDM cover tape.After the cleaning, we brushed primer to the surface and waited for it to dry. After a touch dry test, we installed the cover tape and flashed the entire unit.8. In the case of an EPDM roof, it is necessary to use compatible material to do the flashing. In this case we used EPDM cover tape. It is very important to use a roller to roll the cover tape so it can properly adhere to the EPDM rubber.9. Cover the curb with a tarp.It is difficult to coordinate two different trade crews to complete a A/C unit installment on the same day, but if the A/C contractor marks out where the curb will be installed and leaves the curb on the roof, we can then notify them when the curbing has been completely installed and is ready for the A/C installation.10.

The proper material for the right jobWhenever there is curb to be installed or flashing that needs to be done, it is important to use compatible materials. On an EPDM roof, only EPDM materials must be used. The same principle applies to a Modified Bitumen Torch Down roof; only Modified Bitumen materials should be used. Sometimes, we find that this principle is not practiced by other roofing contractors. In the images below we are flashing a curb with Modified Bitumen Membrane Torch Down material.The image below is also a Modified Bitumen Membrane curb installation. It is essential that a special tar be used to try and seal any flashing, but it should be used very sparingly. Installing a curb is very important and should only be done by professionals.How to Install a Rain Diverter In this how-to video, This Old House general contractor Tom Silva makes a dry entrance In this video, This Old House general contractor Tom Silva explains how to install a rain diverter. Sand underside of flashing with 80-grit sandpaper to help paint adhere;

Spray-paint bottom surface and up-turned edge of flashing to match color of roof. Cut flashing in half using aviation snips. Use flat pry bar to loosen stuck roof shingles. Lay one flashing piece upside-down (painted side facing up) on roof at an angle and slip it under the shingles; repeat for the other flashing piece. Secure the flashing with roofing nails; be sure to place each nail under a shingle. Cover the nail heads and seal down each shingle with caulk. Spray the roof with a garden hose to test the effectiveness of the rain diverter. Tools for Installing a Rain Diverter Flat pry bar to loosen stuck roof shingles Aviation snips to cut flashing 1. 10-foot-long drip-edge flashing 2. 80-grit sandpaper, used to scuff up aluminum flashing 3. Spray paint the color of roof shingles, used to paint flashing 4. 1 ¼-inch roofing nails, to attach flashing to roof 5. Tri-polymer caulk, for sealing nail heads and roof shingles